跳至内容
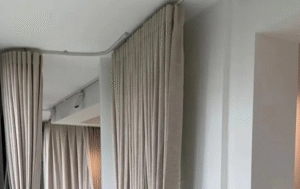
跳至内容 Hello, I’m a Window Treatment Installation Expert from Yuson, and one of the most common issues I help homeowners and renters solve is the dreaded mid-span sag. When you have beautiful, wide windows, the last thing you want is a drooping curtain rod or bent blind headrail ruining the view. Sagging not only looks unprofessional but also puts stress on your walls and makes operation difficult.
Based on our experience, preventing sag comes down to smart reinforcement and choosing the right hardware for the job. Here are the eight professional mounting methods we recommend at Yuson to ensure your curtains, blinds, and shades hang perfectly straight, no matter the width.
The 8 Core Methods
1. Install Center Support Brackets
This is the classic, go-to solution for most sagging rods. By adding one or more support points, you effectively shorten the unsupported span and distribute the weight load evenly.
-
Installation Steps:
- Measure the total width of your curtain rod or headrail. Find the exact center point and mark it on the wall above the window.
- For extra-long windows (over 8 feet), plan for a bracket every 30-36 inches for even support.
- Use a stud finder to see if your mark aligns with a wall stud. If so, you can mount directly into it. If not, you’ll need a suitable wall anchor.
- Install the bracket, ensuring it’s level with the end brackets and doesn’t obstruct the path of the curtain rings or blind mechanism.
-
Pros: Simple, inexpensive, and highly effective for most situations.
-
Cons: Requires drilling additional holes. Bracket placement is crucial to avoid interfering with a single, wide curtain panel.
-
Best For: Any setup with spans over 5-6 feet, especially with heavy curtains or blinds where sagging is already visible.

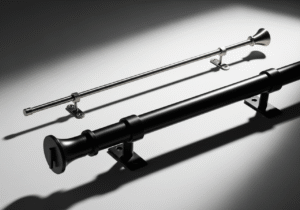
2. Upgrade to a Thicker, Heavy-Duty Rod or Headrail
The material and diameter of your rod are your first line of defense. A flimsy or undersized rod is guaranteed to bend under its own weight, even before you add curtains.
-
Installation Steps:
- Choose a rod with a larger diameter (1 3/8-inch or more) made of steel, iron, or thick-walled aluminum. At Yuson, we design our heavy-duty rods to support loads of 40 lbs or more.
- Ensure the rod is rated for both the weight of your fabric and the span it needs to cover.
- Install using the high-quality end brackets that come with the rod.
- Even with a heavy-duty rod, always add a center support if the span exceeds 8 feet.
-
Pros: Inherently sag-resistant and provides exceptional long-term durability for daily use.
-
Cons: Higher initial cost than standard rods and may require specific, matching heavy-duty brackets.
-
Best For: Permanent installations on extra-wide windows (8+ feet) or when using very heavyweight fabrics like velvet, blackout, or thermal drapes.
3. Mount Brackets Directly into Wall Studs
Anchoring to the structural frame of your home provides the most secure hold possible. This method isn’t just about preventing sag; it’s about preventing the entire system from pulling out of the wall.
-
Installation Steps:
- Use an electronic stud finder to locate the wooden studs behind the drywall. They are typically spaced 16 or 24 inches apart.
- Mark the locations of the studs that fall within your desired bracket placement area.
- Position your brackets over these marks and use a level to ensure they are aligned.
- Drill pilot holes directly into the studs and then drive the mounting screws in for a rock-solid hold.
-
Pros: The strongest and most reliable mounting method. No extra hardware like anchors is needed.
-
Cons: Studs may not be located exactly where you want your brackets for perfect visual symmetry.
-
Best For: Any drywall or plaster wall, especially when supporting heavy treatments over any span width. This is the professional standard.

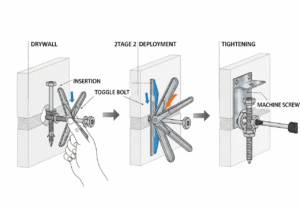
4. Employ High-Quality Wall Anchors or Toggle Bolts
When mounting into studs isn’t an option, a correctly chosen wall anchor is the next best thing. This is crucial for hollow walls like drywall.
-
Installation Steps:
- Select an anchor rated for at least twice the total weight of your rod and curtains. For heavy loads, a toggle bolt or strap-toggle is an excellent choice.
- Drill a hole as specified by the anchor’s instructions.
- Insert the anchor or toggle bolt. For toggle bolts, ensure the "wings" fully deploy behind the drywall.
- Place your bracket over the hole and tighten the screw to secure it firmly against the wall.
-
Pros: Highly versatile for any non-stud location and easy to install.
-
Cons: Less secure than a stud mount for extremely heavy loads. Can cause wall damage if overloaded or installed improperly.
-
Best For: Renters, or for mounting on hollow walls where stud alignment is inconvenient. Ideal for light to medium-weight treatments.
5. Increase Bracket Frequency (Every 30-36 Inches)
Instead of relying on just end brackets and a single center support, create a multi-point support system along the entire width.
-
Installation Steps:
- Plan your bracket layout by dividing the total window width into segments of 30-36 inches.
- Mark the position for each bracket, using a level to keep them perfectly aligned horizontally.
- Install each bracket using either a stud or a proper wall anchor.
- For this to work with curtains, you’ll need C-rings or bypass brackets that allow the curtain to glide past the intermediate supports.
-
Pros: Creates incredibly even weight distribution, virtually eliminating any chance of sag.
-
Cons: Requires drilling many holes in the wall. Can limit curtain movement unless you use specialized bypass hardware.
-
Best For: Very long horizontal spans, such as across sliding glass doors or a bank of windows.

6. Switch to a Professional Curtain Track System
For the ultimate in sag-free performance over any width, nothing beats a track system. The carriers run within an enclosed channel, so there is no rod to bend.
-
Installation Steps:
- Select a wall-mount or ceiling-mount track. Our Yuson track systems are engineered for smooth gliding over extreme widths.
- Cut the track to the exact desired length.
- Mount the track directly to the ceiling or to the wall using small, low-profile brackets, spaced every 24-30 inches.
- Slide the carriers or gliders into the track and attach your curtains using drapery hooks.
-
Pros: Absolutely no sagging, regardless of width. Allows curtains to glide effortlessly from end to end. Offers a clean, minimalist aesthetic.
-
Cons: A more involved installation process. Curtains typically require drapery pins and heading tape rather than rod pockets or grommets.
-
Best For: Very wide windows (10+ feet), bay windows, room dividers, or for achieving a modern, hotel-like appearance.
7. Add Reinforcing Clips or Brackets for Blinds
Wide blinds and shades are prone to the headrail itself bending. Most manufacturers include center support brackets for this reason, and you should always use them.
-
Installation Steps:
- Identify the center point of your blind’s headrail.
- Install the supplied center support bracket(s) at this point, ensuring it doesn’t interfere with the blind’s internal mechanisms.
- Snap the headrail securely into all brackets (end and center).
- For extra-wide venetian blinds, you can also find aftermarket "grip brackets" that help prevent the slats from sagging.
-
Pros: Quick, easy fix specifically designed for blinds. No major modifications are needed.
-
Cons: Brackets are specific to the blind type and may be visible.
-
Best For: Wide venetian, mini, or cellular blinds where the top headrail shows signs of bending.
8. Use Specialty Bendable or Extendable Rods
For non-standard windows, specialty rods offer built-in solutions. These are often sold as complete systems designed to remain rigid over their specified length.
-
Installation Steps:
- Select a system designed for your specific need (e.g., a bay window kit, an extra-long tension rod with internal support).
- For bendable rods, carefully shape the rod to match your window’s curve before installing.
- Install all included support brackets as per the manufacturer’s instructions. Do not skip them!
- Avoid overextending telescoping rods, as they are weakest at their maximum extension.
-
Pros: Excellent adaptability for bay, corner, or unusually shaped windows. Often includes all necessary no-sag hardware in one kit.
-
Cons: Typically designed for lighter fabrics like voiles and nets; may not support heavy drapery.
-
Best For: Bay windows, extra-wide but lightweight curtain needs, and some renter-friendly or no-drill setups.
Comparison Table: Choosing Your Method
Here’s a quick side-by-side comparison to help you choose the best method for your specific situation.
| Method | Install Ease | Approx. Cost | Ideal Width Range | Long-Term Durability |
|---|---|---|---|---|
| 1. Center Support Brackets | Medium | Low | 5–10 ft | High |
| 2. Thicker/Heavy-Duty Rods | Easy | Medium | 8+ ft | Very High |
| 3. Mount Directly into Studs | Medium | Low | Any Width | Highest |
| 4. High-Quality Wall Anchors | Easy | Low | Any Width | High |
| 5. Close Bracket Spacing | Medium | Low | 6–12+ ft | High |
| 6. Curtain Track Systems | Hard | Medium | 10+ ft | Very High |
| 7. Reinforcing Clips (for Blinds) | Easy | Low | 4–8 ft | Medium |
| 8. Bendable/Specialty Rods | Medium | Medium | Up to 17 ft | Medium |
Final Pro Tips from Yuson
- Measure Twice, Install Once: Before you drill any holes, double-check your measurements and use a spirit level to guarantee your brackets are perfectly aligned. An unlevel installation creates uneven stress points.
- Combine Methods for Best Results: Don’t be afraid to combine these techniques. Using a heavy-duty rod (Method 2) that is mounted into wall studs (Method 3) and supported with a center bracket (Method 1) is the professional secret for a flawless, bulletproof installation on ultra-wide windows.
- Renter-Friendly Solutions: If you’re renting, prioritize high-quality tension rods with non-slip ends for lighter curtains. For heavier treatments, seek permission to use robust toggle bolt anchors (Method 4)—they are strong and leave a relatively small, easy-to-patch hole.
By following these expert-approved methods, you can confidently hang any window treatment and achieve a beautiful, sag-free result that lasts.
Frequently Asked Questions (FAQ)
1. Why do my curtains sag in the first place?
Sagging occurs when the weight of the curtain fabric is too much for the strength and span of the rod or headrail. Over a wide distance (typically 5+ feet), gravity will cause even sturdy-looking rods to bend without proper center support.
2. How many center support brackets do I actually need?
A good rule of thumb is to place one support bracket in the exact center for windows up to 8 feet wide. For anything wider, you should install a support bracket every 30-36 inches to ensure the load is distributed evenly.
3. What should I do if the wall studs aren’t in the right place for my brackets?
If studs aren’t conveniently located, your best option is to use a high-quality hollow-wall anchor. For heavy curtains, a toggle bolt or strap-toggle provides the most secure hold in drywall. Never mount heavy treatments into drywall alone.
4. I’m using a heavy-duty rod. Do I still need a center support bracket?
Yes, most likely. While a heavy-duty rod resists bending much better, we at Yuson always recommend adding a center support if the span exceeds 8 feet. This guarantees long-term durability and prevents even minor sagging over time.
5. Which type of wall anchor is best for very heavy blackout curtains?
For heavy loads in hollow walls (drywall, plaster), a metal toggle bolt is the professional’s choice. They expand behind the wall to distribute the weight over a larger area, providing a much stronger hold than standard plastic anchors.
6. If I use multiple brackets, can I still slide my curtains open in one motion?
Yes, but you need specific hardware. Use a curtain track system or a rod paired with "C-rings" or "bypass brackets." These are designed to allow the rings to pass over the support brackets without getting stuck.
7. Are curtain tracks really better than rods for wide windows?
For preventing sag over very wide spans (10+ feet), yes. Because the carriers run inside an enclosed track, the concept of a "rod sagging" is eliminated entirely. They provide the smoothest operation for extra-wide or bay windows.
8. Can I use a heavy-duty tension rod to avoid drilling on a wide window?
Generally, no. Tension rods rely on pressure against the window frame and are best suited for lightweight curtains in smaller openings. For wide windows and heavy fabrics, the tension required would be immense and likely damage your walls or fail over time.
9. What is the absolute strongest way to hang my curtains?
The strongest possible installation is mounting a heavy-duty rod or track with brackets screwed directly into the wooden wall studs. This anchors the entire system to your home’s structural frame.
10. As a renter, what’s my best option for a wide window?
For lighter curtains, a high-quality tension rod with non-slip grips can work. For medium-weight curtains, seek your landlord’s permission to install toggle bolts. They provide excellent security and the holes are small and easy to patch when you move out.