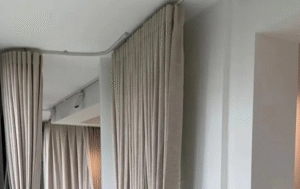
Have you ever supplied a top-tier motorized track system, only to get a call about a strained motor or sagging rail? You trust the product, but the installation fails, putting your reputation on the line. These complex systems demand more than a basic instruction manual. The real problem is a knowledge gap between the hardware’s capability and the installer’s understanding. The right training resources are the solution, transforming installers from simple technicians into expert partners who guarantee flawless results.
The most effective training resources for advanced curtain tracks are those that teach the core engineering principles behind the installation, not just the step-by-step procedures. While videos and manuals are useful, true competence comes when an installer understands the ‘why’—such as the physics of load distribution or shear stress on brackets. This knowledge allows them to adapt to real-world site conditions and solve problems independently, ensuring a perfect installation even when things aren’t textbook-perfect.

I learned this firsthand years ago. We supplied a heavy-duty track for a hotel lobby with a beautiful, long window. The installer followed our manual to the letter. A month later, the track had a slight bow in the middle, and the curtain’s movement was sluggish. The installer had followed the ‘how’ perfectly, but they didn’t understand the ‘why’ of load distribution over a long span. Training that only teaches installers to copy a perfect scenario is brittle. The moment they face an unexpected challenge, it breaks. We need to provide training that builds engineering intuition, creating resilient, problem-solving partners.
What advanced installation techniques should professionals master for heavy-duty or large-scale curtain track systems?
An installer just finished fitting a beautiful, 20-foot motorized track you supplied. They followed the standard guide, but a week later, the client calls you. The motor is making a straining noise, and the heavy drape seems to sag in the middle. The client blames your product, and the installer is frustrated because they "did everything by the book." The truth is, standard rules don’t apply to large-scale projects, and without mastering advanced techniques, even the best products can fail.
For heavy-duty or large-scale systems, professionals must master techniques beyond basic fixing. This includes accurately calculating load distribution for heavy drapes, identifying and using structural anchoring points instead of just drywall, and implementing intermediate supports for both the motor and long track spans. Critically, they need to understand how shear stress affects brackets over time to prevent sagging and ensure long-term stability. This advanced knowledge is what separates a standard installer from a certified expert.

Understanding Load Distribution
A curtain’s weight is not evenly distributed. When the curtain is open, its entire weight—the "stacking weight"—is concentrated on the ends of the track. If the curtain is motorized, this puts immense strain on the motor and the brackets at the motor end. A professional installer must know how to calculate this load and reinforce the installation at these critical points. They need to add extra brackets around the motor and at the stack-back points to handle this concentrated force.
The Critical Role of Anchoring
The most robust track is useless if it’s attached to a weak surface. An advanced installer can identify true structural anchoring points like wooden studs, metal beams, or concrete, and they know when to say "no" to a proposed location. For a heavy motorized drape, fixing into drywall alone is an absolute guarantee of failure. They must be equipped with the tools and knowledge to locate studs or use specialized toggle bolts that can distribute the load across a larger area of the wall structure.
Intermediate Supports for Motors and Spans
For any motorized track longer than about 5 meters, an intermediate motor support is not optional—it’s essential. This extra bracket helps support the motor’s gearbox, preventing it from twisting under torque and burning out prematurely. Similarly, long spans of track require intermediate ceiling supports, even if the walls are solid. These supports prevent the track from bowing under its own weight plus the curtain’s weight over time, ensuring a smooth glide for years.
| Technique | Standard Installation | Advanced (Heavy-Duty) Installation |
|---|---|---|
| Bracket Spacing | Every 50-60 cm | Every 40 cm, with extra brackets at ends and motor. |
| Anchor Type | Standard plugs for drywall/masonry. | Structural anchors only (studs, toggle bolts). |
| Motor Mounting | Motor attached directly to the track. | Motor attached with an additional intermediate support bracket. |
| Span Support | Relies on wall brackets only. | Includes intermediate ceiling supports for spans over 5m. |
Which training formats—video tutorials, digital manuals, or in-person workshops—most effectively improve installer competence?
You’ve invested in creating detailed video tutorials for your products. You send the link to your client’s installation team. They watch it, nod, and head to the job site. But when they encounter an uneven ceiling, a problem not covered in the pristine studio environment of the video, they’re stuck. The project stalls while they try to get someone on the phone. Your investment in training feels insufficient, as it failed to prepare them for the messy reality of a real job site.
A blended training approach is the most effective for improving installer competence. Each format serves a specific purpose. Video tutorials are excellent for demonstrating specific procedures visually. Digital manuals are invaluable for quick, on-site access to technical specifications. However, in-person or live-video workshops are unmatched for building deep expertise. They allow for hands-on practice and direct Q&A, which is where installers truly learn to understand the core engineering principles and become real problem-solvers.

The Power of Visual Learning: Video Tutorials
When an installer needs to learn a specific, repeatable task—like how to program a remote control or attach a new type of glider—nothing beats a short, clear video. People are visual learners. Seeing the process happen is more intuitive than reading a paragraph about it. We use videos to cover the "how-to" of our systems. They are perfect for reinforcing standard procedures and serve as a great refresher tool that an installer can pull up on their phone right on the job.
On-the-Go Knowledge: Digital Manuals
While a video is great for processes, it’s inefficient for finding a single piece of data. An installer on a ladder doesn’t want to scrub through a 10-minute video to find the maximum weight capacity of a bracket. This is where a well-organized, mobile-friendly digital manual excels. It should be searchable and provide immediate access to technical data sheets, compatibility charts, and troubleshooting guides. It’s the on-site reference library.
Deep Learning: Workshops
Workshops—either in person or live via video conference—are where true expertise is forged. This is where we teach the "why." In a workshop, installers can hold the product, bend it, and feel the torsional stress we talk about. They can ask an engineer complex questions about non-standard situations. This hands-on, interactive environment builds a deep, intuitive understanding of the materials and forces at play. It’s an investment, but it pays for itself by creating installers who can think critically and solve problems without needing to call for help.
| Training Format | Best For… | Pros | Cons |
|---|---|---|---|
| Video Tutorials | Demonstrating procedures (The "How"). | Highly visual, accessible, great for refreshers. | Not interactive, poor for non-standard situations. |
| Digital Manuals | Quick access to data (The "What"). | Searchable, immediate, always available on mobile. | Lacks context, can be dry and hard to interpret. |
| Workshops | Understanding principles (The "Why"). | Interactive, hands-on, builds deep expertise. | Costly, requires time commitment and coordination. |
How can standardized installation workflows minimize rework and ensure consistent results across different projects?
You manage multiple installation teams working across different sites. Team A is fast and efficient, with almost no callbacks. Team B is slower and often needs to return to a site to fix small issues. They have access to the same products and training, so what’s the difference? The problem is a lack of consistency. Without a standardized workflow, each installer relies on their own habits and memory, leading to missed steps, inconsistent quality, and costly rework that erodes your profit margins.
Standardized installation workflows, built around a checklist-driven process, are essential for minimizing rework and ensuring consistency. By breaking the installation down into key phases—Preparation, Mounting, and Commissioning—a workflow ensures no critical step is forgotten. This documented process transforms installation from an art based on individual habit into a science that is repeatable, measurable, and teachable. It guarantees that every project, regardless of the installer, meets the same high standard of quality.

Phase 1: Preparation (Measure Twice, Drill Once)
This is the most critical phase, and it’s where most errors originate. A standard workflow forces the installer to stop and plan before touching a tool. The checklist should include:
- Confirm Measurements: Verify on-site measurements against the plan.
- Inspect Substrate: Check the wall/ceiling material and identify structural anchor points. Is it drywall, concrete, or steel?
- Organize Hardware: Lay out all track components, brackets, and hardware. Confirm nothing is missing.
This simple pre-check can prevent 90% of common errors, like drilling in the wrong place or using the incorrect type of anchor.
Phase 2: Mounting (The Physical Installation)
With the planning complete, the mounting phase becomes a systematic process. The workflow ensures consistency in the details that matter most for performance.
- Mark Bracket Locations: Use a template or laser level to ensure perfectly aligned and spaced brackets, especially around curves and at track ends.
- Secure Anchors: Follow the standard procedure for the specific anchor type being used.
- Attach Track: Snap the track into place and check for level and smoothness before proceeding. A workflow reminds the installer to run a few gliders along the track at this stage to check for any binding.
Phase 3: Commissioning (Final Checks and Handover)
The job isn’t done when the track is up. The commissioning phase ensures the system is performing perfectly and the client is satisfied.
- Test Operation: For motorized tracks, cycle the system multiple times. Check motor limits, speed, and noise. For manual tracks, operate the full length of the curtain.
- Clean Up: A professional leaves the site cleaner than they found it.
- Client Walkthrough: Show the client how to operate the system and answer any questions. This final step dramatically reduces follow-up calls.
| Phase | Key Workflow Task | Benefit of Standardization |
|---|---|---|
| 1. Preparation | Verify substrate and select correct anchors. | Prevents track failure due to improper fixing. |
| 2. Mounting | Use a template for bracket spacing. | Guarantees smooth glider operation and aesthetics. |
| 3. Commissioning | Perform a multi-cycle operational test. | Catches any performance issues before leaving the site. |
For exporters, what kinds of multilingual installation kits or support materials add the most value to overseas clients?
Matt, your client in the US, opens a shipment from your factory. Inside, he finds a neatly coiled track, but also a small, thoughtful kit. There’s a one-page visual guide with no text, just clear diagrams. There are QR codes linking to silent installation videos. The hardware is separated into labeled bags: "For Drywall," "For Concrete." This isn’t just a box with a product in it; it’s a complete, frustration-free solution. This single experience builds immense trust and sets you apart from every other supplier.
For exporters, the most valuable multilingual support materials are those that transcend language barriers. This includes universal visual instructions with clear diagrams and minimal text. QR codes linking to silent, step-by-step videos are incredibly effective. Most importantly, comprehensive hardware kits with components pre-sorted and labeled by wall type (e.g., "Drywall," "Masonry") add immense practical value. These resources reduce installer confusion, prevent errors, and show a deep understanding of the client’s needs.

The Universal Language of Pictures
The most powerful tool in a multilingual kit is a well-designed, one-page visual guide. Think of the instructions from IKEA. They use simple line drawings, arrows, and symbols like "✓" and "✗" to communicate complex steps without relying on words. This approach bypasses translation issues entirely. We focus on highlighting critical steps visually: correct bracket orientation, the direction for snapping in the track, and the proper way to insert end caps.
Silent Video: Show, Don’t Tell
A silent video is the perfect partner to a visual guide. An installer in any country can watch a 2-minute clip and understand the entire installation process. The video should be shot from the installer’s point of view, with clear close-ups on key actions. We use simple text overlays to point out measurements (e.g., "Max 50cm"), but the core instruction is purely visual. Posting these on YouTube makes them easily accessible via a QR code printed directly on the product packaging.
The Problem-Solving Hardware Kit
This is where a manufacturer can truly add value. Instead of providing a single bag of generic screws, a premium kit anticipates the installer’s needs.
- Sorted & Labeled Anchors1: Separate, clearly labeled bags for different wall types. This single detail prevents the most common cause of track failure.
- Inclusion of a Small Tool2: Including a small, cheap tool like a mini hacksaw for trimming the track shows forethought. It tells the client you’ve considered their entire process.
- Spare Parts: Always include a few extra gliders and one extra bracket. It costs pennies, but it can save an installer from having to abandon a job to get a replacement part, saving them hours and making you look like a hero.
| Support Material | Value to Overseas Client | Why It Works |
|---|---|---|
| Visual Guide (1-Page) | Eliminates language barriers and confusion. | Pictures are a universal language. |
| QR Code to Silent Video | Provides clear, on-demand demonstration. | "Show, don’t tell" approach is highly effective. |
| Labeled Hardware Kit | Prevents installation errors and saves time. | Anticipates needs and provides a complete solution. |
Conclusion
The quality of a curtain track is only realized through a perfect installation. To empower installers, especially with advanced systems, we must provide training resources that go beyond simple instructions. By blending accessible video tutorials with detailed digital manuals and immersive workshops, we can teach not just the "how," but the critical "why" behind every step. Standardized workflows ensure this expertise is applied consistently, while thoughtfully designed multilingual support kits remove friction for our global partners. By investing in installer competence, we are investing in our own reputation and ensuring every project is a testament to quality.