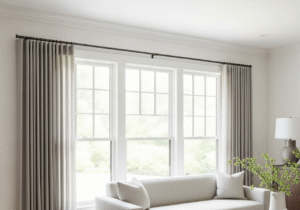
Have you ever sourced a flexible track for a complex bay window, only to field complaints about sticking gliders and an uneven finish? These issues can lead to costly callbacks and damage your reputation for supplying quality hardware. The problem often isn’t the installer or the window, but a hidden physical property within the track itself. Understanding this core challenge is the key to preventing installation failures before they happen, ensuring every project ends with a perfectly smooth, flowing curtain.
The primary installation challenges with flexible curtain tracks in bay windows stem from the material’s inherent properties: "material memory" and "torsional stress." Material memory causes the track to constantly try and revert to its original coiled or straight shape. More critically, as an installer bends the track horizontally, they can unknowingly introduce a slight twist. This torsional stress is the main culprit behind binding gliders and misaligned brackets, creating operational problems that undermine the track’s functionality.

This might sound technical, but it’s a practical problem I’ve seen countless times right from my early days on the factory floor. We’d get reports blaming the installer or the unique angles of a bay window. But the physics don’t lie. The real battle is against the track’s internal tensions. An installer can bend the track into a perfect curve, but if they’ve introduced even a tiny amount of rotational twist, the gliders will never run smoothly. Success isn’t about forcing the track into place; it’s about finessing it while respecting its material properties. To truly grasp this, we need to look at why flexible tracks became necessary and pinpoint where things go wrong.
Why do traditional straight tracks often create gaps or misalignment in curved or bay window layouts?
Sourcing for a large project with dozens of bay windows used to be a logistical nightmare. You’d supply standard straight tracks, only for installers to start cutting them into small sections to fit the angles. This “solution” almost always created more problems. The process was slow, inefficient, and the final result often looked unprofessional and clunky. It generated waste and, worse, left the end user with a curtain system that was prone to snagging and light leaks.
Traditional straight tracks create gaps and misalignment in bay windows because they cannot follow a continuous curve. Installers must cut them into multiple segments and join them with angled connectors. This approach results in a faceted, disjointed line instead of a smooth arc. Each joint becomes a potential snag point for curtain gliders, causing jerky operation. Furthermore, small gaps between the track and the wall or ceiling are inevitable, leading to unsightly light bleed and a less-than-perfect finish.

The Problem with a Faceted Approach
When you force a straight object to fit a curved space, you get a series of flat planes. Think of it like trying to draw a circle using only short, straight lines. From a distance, it might look okay, but up close, the imperfections are obvious. For a purchasing manager like Matt, this isn’t just an aesthetic issue. It’s a quality control problem that can lead to client dissatisfaction. Each joint in a segmented track is a point of weakness and a source of friction, directly impacting the user experience.
Functionality vs. Form
A curtain track has one primary job: to allow a curtain to move smoothly. A segmented system inherently compromises this function. Gliders, especially C-ring types, can catch on the edges of each track section or connector. This not only makes the curtains difficult to operate but also puts extra strain on the gliders and the fabric, leading to premature wear and tear. This is why the demand for single-piece, flexible solutions grew so rapidly; the market needed a product that respected both the form of the window and the function of the curtain.
A Look at Different Window Types
The problem is most pronounced in certain window styles. A gently curving bow window is almost impossible to fit correctly with straight tracks. A bay window with sharp 135-degree or 90-degree angles presents its own challenges, where connectors can disrupt the visual line and create weak points.
| Window Type | Straight Track Challenge | Flexible Track Advantage |
|---|---|---|
| Curved Bow Window | Impossible to create a smooth curve; results in a heavily faceted and gappy fit. | Bends easily to follow the exact contour of the wall for a seamless look. |
| Standard Bay Window | Requires multiple cuts and angle connectors, creating snag points and light gaps. | A single, continuous track provides a smooth glide path with no interruptions. |
| Corner Window | A 90-degree corner piece is needed, which often operates less smoothly than a bent track. | Can be bent on-site to a tight radius, ensuring a consistent and smooth corner transition. |
Ultimately, straight tracks fail in bay windows because they fight the architecture. A flexible track is designed to work with it.
At which angles or bending points are flexible tracks most likely to deform or lose stability during installation?
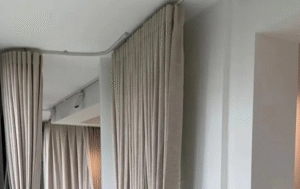
You’ve solved the gap issue by sourcing a flexible track. But then a new complaint surfaces: the curtain gliders are binding, especially around the tightest corners. The installer insists the curve is perfect, yet the operation is stiff. This disconnect happens because the most critical stress on the track isn’t visible. It’s the hidden rotational force introduced during bending, and it’s what separates a flawless installation from a frustrating failure. This problem costs time, money, and erodes trust in the product.
Flexible tracks are most likely to deform or lose stability at tight bending points, particularly angles of 90 degrees or sharper. At these points, two forces work against the installation. First, "material memory" exerts pressure, trying to straighten the track. Second, and more importantly, installers can unintentionally introduce "torsional stress" or a slight twist as they bend the track. This tiny rotation changes the profile of the track, causing gliders to bind and brackets to misalign, compromising the entire system’s stability.

The Physics of the Bend: Material Memory
When we extrude a PVC or aluminum track, the material is set in a straight or coiled profile. This becomes its "memory." When an installer bends it on-site, the material is under constant tension, wanting to return to that original state. In a gentle curve, this force is distributed and easily managed by mounting brackets. However, in a tight 90-degree corner, the force is concentrated. If brackets are not spaced correctly around this bend, the track can start to pull away from the wall or ceiling over time.
The Hidden Enemy: Torsional Stress
This is the insight that solves 90% of "binding glider" complaints. As an installer holds the track and forces it into a horizontal bend, it’s very easy to also apply a slight rotational twist with their hands. The track profile is no longer perfectly vertical. Even a twist of one or two degrees is enough to make the gliders catch. They are no longer running on a flat rail but on a slightly inclined surface. This is why a perfectly smooth curve can still perform poorly.
Identifying High-Risk Points
The risk of deformation and instability isn’t uniform across the entire track. Certain areas are far more vulnerable.
- Sharp 90-Degree Corners: This is the most common failure point. Maximum material memory and the highest risk of torsional stress converge here. Brackets must be placed immediately before and after the bend to lock it in place.
- "S" Curves: In complex layouts with reverse curves, the transition point from a left bend to a right bend can introduce competing stresses. It’s easy for the track to twist at this midpoint.
- The Very First Bend: When taking a track from straight to curved, the initial point of bending is critical. If the twist starts here, it will affect the rest of the installation.
| Stress Type | Description | Common Failure Point | Solution |
|---|---|---|---|
| Material Memory | Track wants to revert to its original shape. | Tight bends, long unsupported spans. | Closer bracket spacing (especially around curves). |
| Torsional Stress | Unintentional twisting of the track profile during bending. | Any corner, but especially 90-degree bends. | Installer training; design tracks that resist twisting. |
| Compression/Stretching | The inside of a curve compresses; the outside stretches. | Very tight radius bends. | Using high-grade, resilient materials that can handle this stress without cracking. |
As manufacturers, our job is to create tracks with a profile that naturally resists twisting and to provide clear guidance on bracket placement to counteract these forces.
What common attachment issues occur when fixing tracks to uneven walls or suspended ceilings?
Imagine your high-quality flexible track is being installed in a luxury apartment with a suspended ceiling. The installer uses standard fixings, but a few weeks later, a section of the track has sagged. The problem isn’t your track; it’s the anchor point. Fixing a track to a non-solid surface like drywall or a ceiling tile requires specialized hardware. Without it, the combined weight of the track and a heavy curtain can cause the fixing to fail, leading to costly repairs and a perception of poor product quality.
Common attachment issues with flexible tracks include fixing failures on uneven walls and instability on suspended ceilings. On uneven walls, brackets may not sit flush, creating stress points that can deform the track or pull away over time. For suspended ceilings or drywall, standard screws are inadequate. Without proper anchors like toggle bolts or specific grid clips, the weight of the track and curtain can easily pull the fixings out, causing the track to sag or fall completely.

Dealing with Imperfect Surfaces
No wall is perfectly flat. When an installer fixes a rigid bracket against an uneven plaster or drywall surface, a small gap can remain. As they tighten the screw, the bracket is pulled under tension, and this force can transfer to the flexible track snapped into it. This can cause a subtle distortion in the track profile, leading to the same binding glider issues we discussed earlier. The key is to ensure the bracket is securely and flatly mounted before the track is even introduced.
The Suspended Ceiling Challenge
Suspended or "drop" ceilings are common in commercial and modern residential spaces. They present a unique challenge. The ceiling tiles themselves have zero load-bearing capacity. The track must be attached directly to the metal grid system that holds the tiles. Even then, the entire ceiling system has a weight limit. For heavy-duty applications with blackout curtains, it may be necessary to anchor the track to the structural ceiling above the suspended grid.
Choosing the Right Hardware is Everything
A track is only as strong as its weakest anchor. Supplying a complete kit with the right hardware is non-negotiable for ensuring a successful installation and safeguarding your product’s reputation.
- Drywall/Plasterboard: Requires specialized anchors (e.g., self-drilling drywall anchors or toggle bolts) that expand behind the board to distribute the load. Standard plastic plugs will not hold.
- Concrete or Brick: A solid masonry wall is the ideal substrate. It requires a masonry drill bit and robust wall plugs.
- Suspended Ceilings: Special clips that twist and lock onto the ceiling grid are essential. It’s critical to know whether you’re attaching to the main "T" bar or a cross-section, as they have different load capacities.
| Surface Type | Standard Fixing (Unsafe) | Correct Fixing (Safe) | Key Consideration |
|---|---|---|---|
| Drywall | Screw with basic plastic plug | Toggle bolt, hollow wall anchor | Distributes weight behind the wall to prevent pull-out. |
| Suspended Ceiling | Screw directly into ceiling tile | Metal clips attached to the ceiling grid | The tile itself cannot support any weight. |
| Uneven Wall | Forcing bracket flush with a screw | Using a shim to level the bracket first | Prevents transferring stress to the track. |
For a purchasing manager, specifying that a hardware kit must include anchors for various wall types is a crucial step in risk management.
How can manufacturers simplify packaging, documentation, and hardware kits to reduce installation errors for international buyers?
Matt, a purchasing manager in the US, receives a shipment of flexible tracks from overseas. The box is long and damaged, the instructions are a poor translation with tiny diagrams, and the hardware bag is missing anchors for drywall. His installers are now confused and wasting time sourcing local parts. This experience immediately creates friction and makes him question the supplier’s reliability. The product might be excellent, but if the "out-of-box" experience is poor, it jeopardizes the entire partnership.
Manufacturers can reduce installation errors for international buyers by optimizing three areas. First, improve packaging by using coiled, compact boxes to prevent shipping damage and reduce costs. Second, create clear, visual documentation with QR codes linking to multi-language instruction videos. Third, supply comprehensive hardware kits that include labeled anchors for various wall types (drywall, masonry, suspended ceilings), eliminating guesswork for installers and preventing them from using incorrect fixings.

Smart Packaging: From Long Boxes to Compact Coils
Traditionally, flexible tracks were shipped in long, 3- or 4-meter boxes. These are expensive to ship, prone to damage, and difficult for installers to handle. The modern solution is to coil the track. A 5-meter track can fit into a compact, pizza-box-style package. This dramatically reduces shipping costs (especially for air freight) and minimizes the risk of damage. From my experience, this single change can cut shipping expenses by over 50% and makes inventory management far easier for our clients like Matt.
Documentation That Speaks Every Language: Visuals and Video
The biggest barrier for international buyers is often language. Text-heavy manuals with poor translations are a recipe for disaster. The solution is to prioritize visuals.
- Step-by-step Diagrams: Use large, clear illustrations that show, not just tell. Highlight critical steps like bracket placement around curves.
- QR Codes to Video: A QR code on the instruction sheet can link directly to a short, silent installation video. An installer in any country can watch a visual demonstration and understand the process perfectly without needing to read a word.
- One-Page Quick Start Guide: Provide a simple, visual guide for the most common installation types.
The All-in-One Hardware Kit
An installer should never have to go to a hardware store to finish a job. A complete, professional hardware kit1 is a powerful statement about a manufacturer’s quality2 and attention to detail.
| Included Component | Purpose | Why It Matters to an International Buyer |
|---|---|---|
| Labeled Anchor Bags | Separate bags for "Drywall" and "Masonry." | Eliminates confusion and the risk of using the wrong anchor. |
| Saw & End Caps | A small hacksaw for trimming and clean end caps. | Provides everything needed for a custom fit, reinforcing supplier reliability. |
| Extra Brackets/Gliders | A few spares of each. | Accounts for accidental loss or breakage on-site, preventing project delays. |
By investing in the out-of-box experience, we aren’t just selling a track; we are delivering a complete, frustration-free solution. This is how strong, long-term partnerships are built and maintained.
Conclusion
Successfully installing a flexible curtain track in a bay window is less about the installer’s skill and more about understanding the product’s physics. The primary challenges are not the window’s angles but the track’s inherent material memory and the hidden risk of torsional stress during bending. By acknowledging these forces, using correct anchoring techniques for different surfaces, and providing clear, visual instructions with comprehensive hardware kits, we can eliminate the most common points of failure. As a manufacturer, our role is to engineer solutions that anticipate these challenges, making the installer’s job easier and ensuring the end user receives the smooth, reliable performance they expect.